Roles
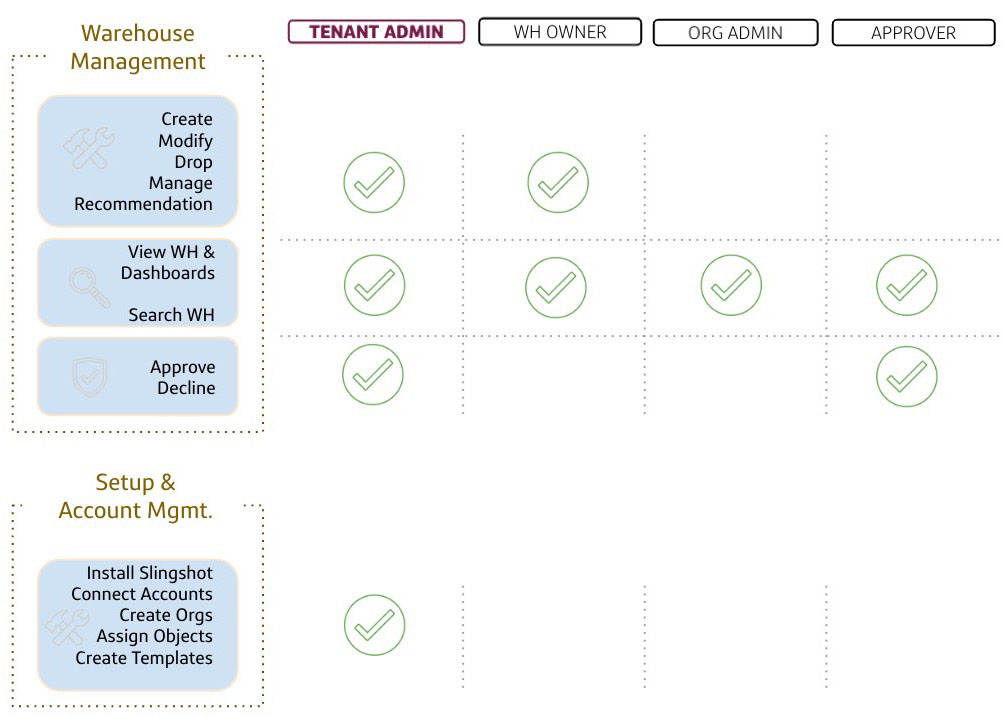
Your Slingshot role determines which permissions you have to manage warehouses, how those actions impact dashboard views, and which warehouses appear in My Warehouses. You could be assigned to multiple roles (e.g. Approver and Warehouse owner).
Slingshot roles include:
- Tenant Admins - Access to do everything an Approver, Org admin, and Warehouse owner can do in Slingshot with additional permissions to complete configuration and installation activities (e.g creating Slingshot tags, etc.).
Approvers - Review, approve, deny requests, and search or view warehouses and dashboards.
Org Admins - Have visibility of all warehouses in their org and their corresponding dashboards.
Warehouse Owners - Manage warehouses by creating, modifying, assigning tags, etc.
LOB Viewer - Tenant admins give teammates read only acess to specific lines of business in Slingshot.

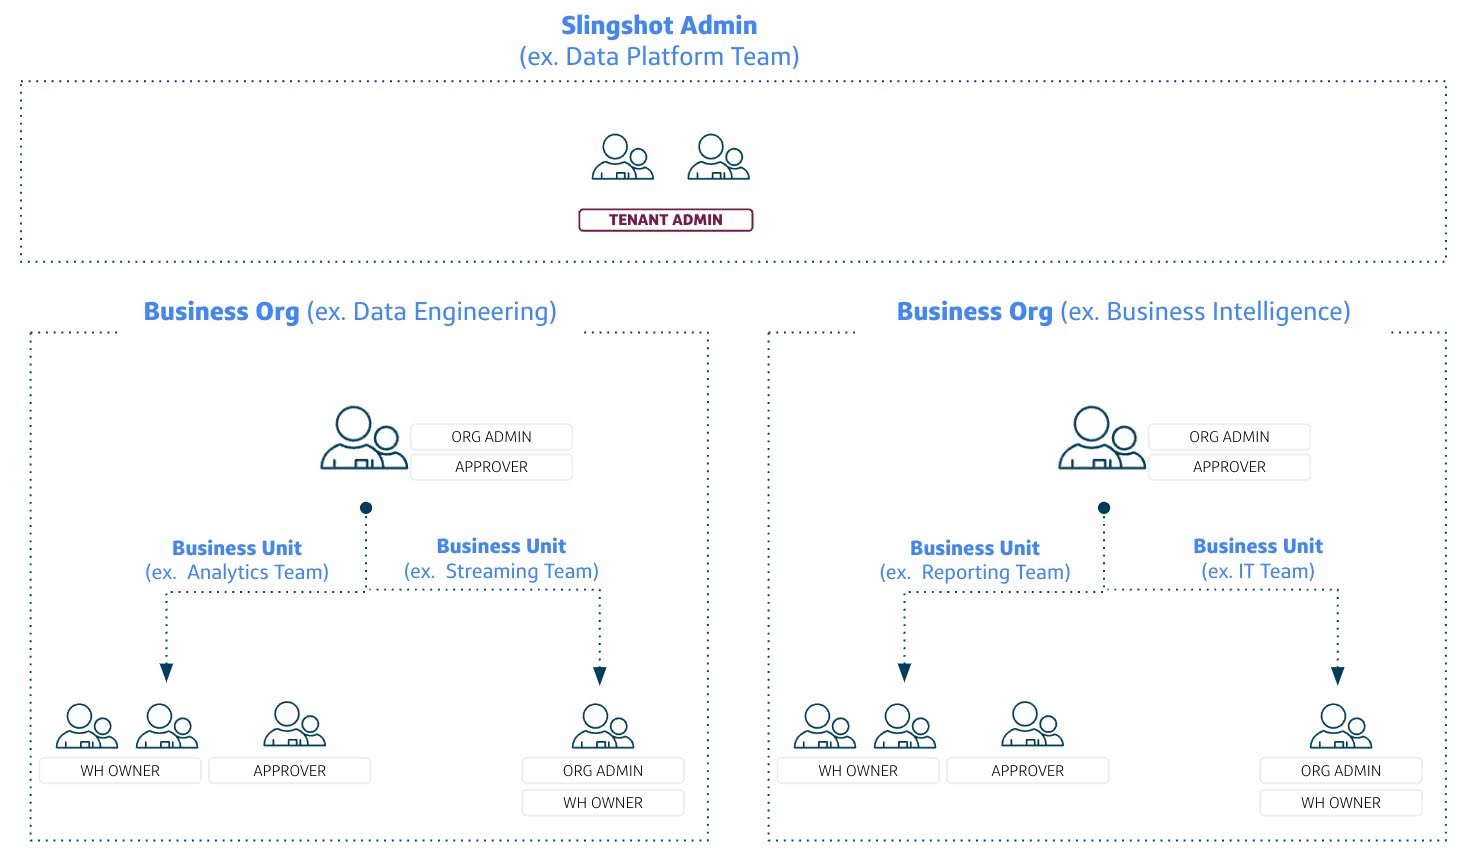
Here’s an example of how Slingshot roles look once implemented in your business. In this example, the Data Platform Team are the Slingshot admins in the Tenant admin role overseeing 2 business orgs - Data Engineering and Business Intelligence. Each business org has an Org admin, Approvers, and Warehouse owners. As seen in the example, assigning more than one role is possible. Remember Tenant admins have exclusive access to perform all actions within your Slingshot tenant.

What can I do in Slingshot?
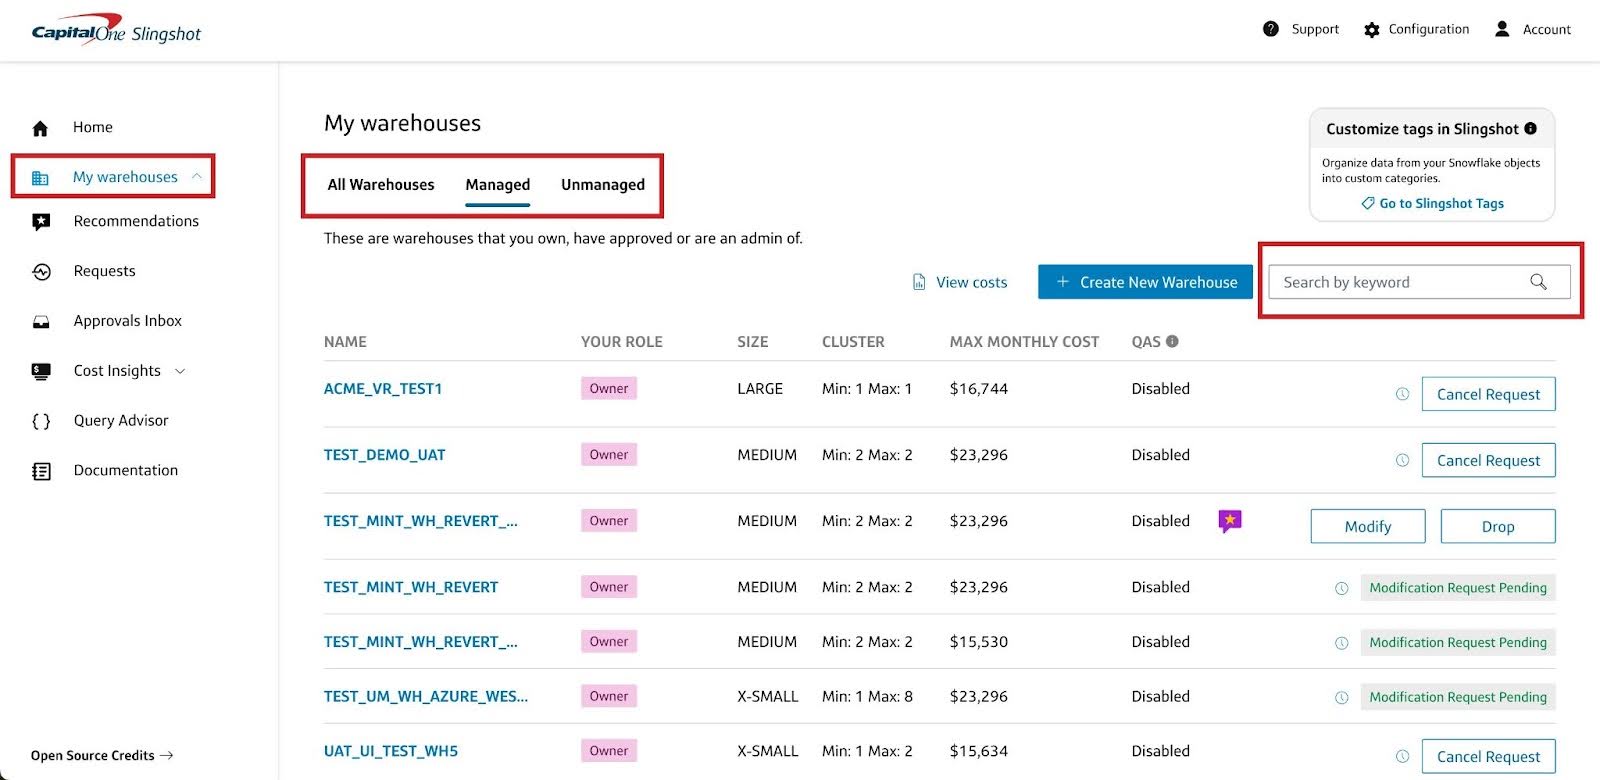
Everyone has permission to search and view warehouses. Your Slingshot role and business org or business unit determine which warehouses appear on My Warehouses page.
The Managed tab displays warehouses with an assigned schedule. The Unmanaged tab shows warehouses brought into Slingshot and need a schedule applied by the Warehouse owner.

View warehouses
To view a warehouse (managed or unmanaged)
From My Warehouses, select the Managed or Unmanaged tab.
View the warehouse details by pressing the warehouse name.
The Warehouse details appear.
Review the details. Press the X in the upper right corner to close the panel.
If you aren’t a warehouse owner, you see a message stating, “You do not have the warehouse owner permission to modify this warehouse.” Warehouse owners make adjustments to their assigned warehouses’ schedules and parameters.
Search the warehouse list
It’s a daunting task scrolling through several pages to find a particular warehouse. Slingshot’s responsive search makes finding a warehouse easier. Search by entering a warehouse name (or a portion of the name), role, size, cluster, max monthly cost, QAS, etc.
- Enter search criteria into the Search box.
- Review the results.
- Clear the search by pressing the X.
- With the search parameter cleared, the entire list of warehouses reappears.
Configuration & Setup
Slingshot role: Tenant Admin
Assign warehouses to a business org or unit
Tenant admins assign warehouses to business orgs and units. These assignments determine the parameters and warehouse templates applied to each warehouse.
- Select Configuration from the top-navigation menu.
- Choose the Assign Snowflake Objects card.
- From the list of warehouses, check the box next to the warehouse name you’d like to assign. The Assign button becomes active.
- Press Assign.
- Select Business Organization or Business Unit from the drop-down menu.
- Press the Assign button.
- Review and Confirm Assignment. Or go back to choose another line of business.
- A success message appears. Assign another warehouse or go to the homepage.
You’ll receive a notification once the migration completes, and it’ll be added to the Your Warehouses page.
Once warehouses are assigned and added to Your Warehouses, a Reassign button appears; allowing you to assign the warehouse to a different business org or unit.
For more configuration activities, visit Configuration.
Reassign a managed warehouse
Tenant admins reassign Business Organization, Warehouse Environment, or Warehouse Templates for managed warehouses. Managed means the warehouse has a defined schedule.
- From Your Warehouses, select the All Warehouses tab.
- Use the Reassign button for the chosen warehouse.
- Update the Business Organization, Warehouse Environment, or Warehouse Template from the corresponding drop-down menu.
- Once you’re happy with your selection(s), press Continue.
- Review the details, and Confirm.
- After a few moments a success message appears.
- Review other warehouses or make other reassignments.
Reassign an unmanaged warehouse
Tenant admins reassign Business Organization or Business Unit for unmanaged warehouses. Unmanaged means the warehouse has the option to apply a schedule. Applying a schedule moves the warehouse from unmanaged to managed.
- From My Warehouses, select the Unmanaged tab.
- Use the Reassign button for the chosen warehouse.
- Update the Business Organization or Business Unit from the corresponding drop-down menu.
- Once you’re happy with your selection, press Save.
- After a few moments a success message appears.
- Review other warehouses or make other reassignments.
Warehouse Management
Slingshot allows Warehouse owners, Tenant admins, and Org admins to make adjustments to warehouses. Approvers, like the name says, approve requests. To read more about warehouse management, visit My Warehouses.
Manage permissions for a warehouse
- From My Warehouses, select the Managed tab.
- View the warehouse permissions by pressing the warehouse name.
- The warehouse details appear.
- Select the Manage permissions tab.
- In the User role name box, enter a role name or choose a selection from the drop-down list.
- Save.
- The role and status appear. After the role assignment processes successfully the status message changes from Processing to Granted.
- Refresh the status to confirm that permissions were granted to the selected Role.
- Review the details. Use the X in the upper right corner to close the window.
Remove permissions for a warehouse
From Your Warehouses, select the Managed tab.
View the warehouse permissions by pressing the warehouse name.
The Warehouse details appear.
Select the Manage permissions tab.
From the User role list, check the box next to the role you’d like removed.
Use the Revoke access button.
Confirm.
Review the details. Use the X in the upper right corner to close the window.
Approvals
Approvers act as gatekeepers for various requests in the assigned business org or unit (e.g. warehouse provisioning requests, changing a current warehouse schedule, etc). As an Approver, you have the ability to approve, decline, and view assigned requests.
View requests
To view requests,
- Press Requests on the left navigation menu.
- Select the Pending, Approved, or Declined tab to see a list for requests with those statuses.
Or
- From the homepage, scroll to the Approvals Inbox section.
- Click the View Request button for the chosen request.
- Review the Warehouse Modification Request details.
- If necessary, add a message, then decline or approve the request. Always include an explanation for denied requests.
Approve or Decline requests
The Approvals Inbox provides you with tabs for
- Open Requests,
- In Progress requests,
- and Closed Requests.
The Closed Requests tab shows processed requests.
Each list includes the warehouse name, request type, status, requestor, maximum monthly cost, and request date.
To approve or decline requests
- Scroll down to the Approvals Inbox on the Homepage or select Approvals Inbox from the left navigation menu.
- Use the Approve button to approve a request - or - use the Decline button to deny the request and add a message explaining the denial.
- Select Decline Request (if necessary).
- The list refreshes and the request disappears from the Approvals Inbox.