My Warehouses
Learn how to get started with Snowflake Warehouse optimization by watching our tutorial video here.
What can I do with My Warehouses?
The Warehouses page displays a comprehensive list of available warehouses that a particular user can take action on inside Slingshot. From the Warehouses page, users can:
- View a unified table of all available warehouses across management status (Managed vs. Unmanaged):
- Managed warehouses are warehouses that have been assigned a schedule.
- Unmanaged warehouses are warehouses that have been brought into Slingshot and need a schedule to be applied by the warehouse owner.
- Filter the table by:
- Name: Warehouse name
- Org: Org name
- Account: Account name
- Warehouse management: Managed vs. Unmanaged
- Query acceleration service (QAS): Enabled vs. Disabled
- Alerts: Triggered vs. None
- Optimizations: Available vs. None
- View which warehouses have available recommendations by referring to the optimization icon (blue callout balloon).
- View which warehouses have a triggered alert by referring to the alert icon (yellow exclamation point).
- Export the list of Warehouses inside the table to a CSV file.ℹ️Note: The exported CSV data is based on the filters applied to the table.
Roles for warehouses
- View warehouses:
- Tenant admin
- Snowflake admin
- Snowflake owner
- Snowflake viewer
- Snowflake approver 1 & approver 2
- Edit warehouses:
- Tenant admin
- Snowflake admin
- Snowflake owner
Warehouse details
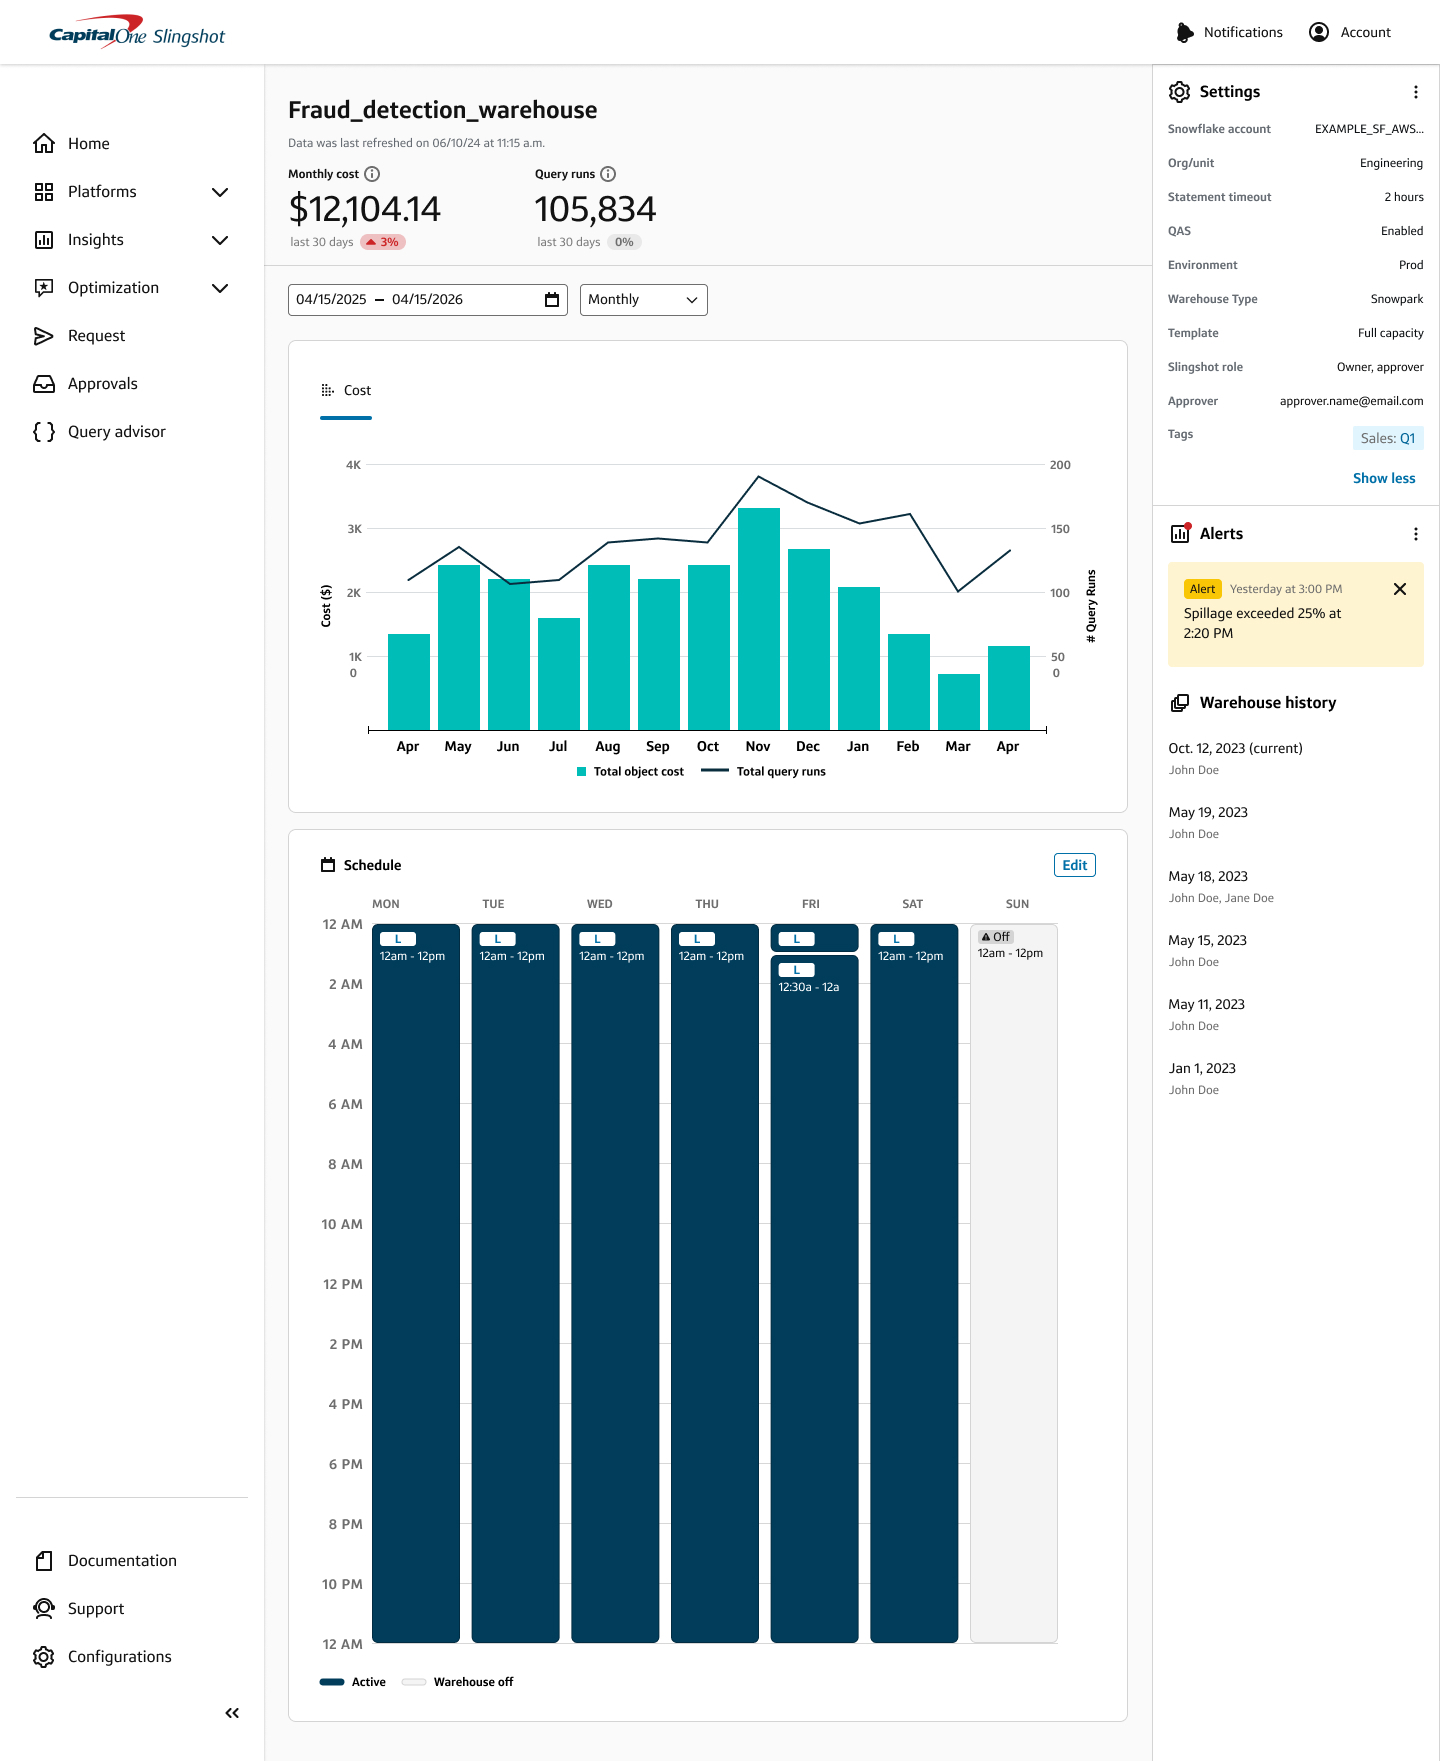
To view details for a particular warehouse, click the warehouse name link in the table and you will be directed to the Warehouse details page. This page outlines important details and information about the warehouse, including:
Quick insights
- Monthly cost: The total cost of your warehouse over the last 30 days.
- Query runs: The query runs over the last 30 days.
- Average query execution: The average run time of queries ran over the last 30 days.
View data about the warehouse cost, performance, and queries:
- Select the date range and time increment (monthly or weekly) for the warehouse cost and query runs you want to view.
- Cost: Total warehouse cost in dollars and total queries run on the warehouse.
- Performance: Select the radio button for the metric you want to view.
- Queuing & timeout: The number of queries that have entered a queue and the number of queries that have timed out.
- Bytes scanned & spill: The total bytes spilled and total number of bytes scanned.
- Queries: Select the radio button for the metric you want to view.
- Query sizes: The total number of queries ran from 1-5 minutes, the total number of queries ran in under 1 minute, and the total number of queries ran in over 5 minutes.
- Micro-partition scanned: The total number of queries that had 100-500 partitions scanned, the total number of queries that had under 100 partitions scanned, and the total number of queries that had over 500 partitions scanned.
- Run-time: The average query run time of all queries run in the selected time period (Month, Week, Day).
Current schedule
⚠️All time blocks on are in US Eastern Time.- View the current warehouse schedule.
- Edit the current warehouse schedule.
- If you edit an unmanaged warehouse, you will trigger the manage an unmanaged warehouse flow.
- If you edit a managed warehouse, you will modify the existing warehouse schedule.
Settings
- View and edit warehouse settings including account, org, statement timeout value, QAS, environment, warehouse type, template, tags, and resource constraint.
Alerts
- View all alerts that have been triggered for the warehouse.ℹ️Only warehouse owners will be able to dismiss alerts.
- View all alerts that have been triggered for the warehouse.
Warehouse history
- View entries for every change made to a warehouse, including the day and the user who made the change.
- Click into a history entry to view the warehouse settings associated with the change to track changes over time and revert to old settings.
Manage an unmanaged warehouse
Similar to other warehouse requests, Warehouse Owners submit management requests. Warehouses listed here are not currently managed in Slingshot. Adding them to your managed warehouse list is as easy as completing a form.
You can trigger the manage warehouse flow from two locations:
a. Navigate to a warehouse that has the Managed column set to No, click the overflow menu (three dots all the way on the right), and select Manage.
b. Navigate to Warehouse details page and click Edit in the Schedule section.
Select a Warehouse Environment from the drop-down menu.
Then choose a Warehouse Template.
Select a Resource Constraint (Gen1 or Gen2).
Adjust the Statement Timeout.
Select Continue.
Set a schedule or create a new schedule by making the following selections (you can also use the default schedule):
- End Time
- Warehouse Size
- Cluster Minimum
- Cluster Maximum
- Scaling Policy
- Auto Suspend
- Toggle Warehouse on or off
Select Continue.
Review the information and Submit the request for approval.
Until the request is approved, the Management Request Pending icon will replace the overflow menu for the warehouse you requested to manage.
ℹ️Note: The icon will show who submitted the management request and the date/time they submitted the request.
Once approved, the Manage column in the table will change to Yes.
Modify a managed warehouse
Once a warehouse is managed, you have full control over its settings in Slingshot.
You can trigger the manage warehouse from two locations:
a. Navigate to a warehouse that has the Managed column set to Yes, click the overflow menu (three dots all the way on the right), and select Edit.
b. Navigate to Warehouse details page and click Edit in the Schedule section.
Fill in the warehouse details.
Click Modify schedule.
Define the warehouse schedule across each day.
Click Review schedule.
Review the settings and Submit the request for approval.
Until the request is approved, the Modification Request Pending icon will replace the overflow menu for the warehouse you requested to modify.
ℹ️Note: The icon will show who submitted the modification request and the date/time they submitted the request.Once approved, the new warehouse settings/schedule will take effect.
Drop a managed warehouse
Dropping a managed warehouse deletes the warehouse.
Navigate to a warehouse that has the Managed column set to Yes, click the overflow menu, and select Drop.
A modal screen appears and prompts you provide a business justification.
Select Submit for approval.
Until the request is approved, the Drop Request Pending icon will replace the overflow menu for the warehouse you requested to drop.
ℹ️Note: The icon will show who submitted the drop request and the date/time they submitted the request.Once approved, the warehouse will no longer be active or appear in the Warehouses table, but historical will be retained.
Create a new warehouse
Warehouse owners may create warehouse provisioning requests.
Approvers are tasked with approving or denying warehouse provisioning requests.
Click the + Create warehouse button.
Set the parameters for the new Warehouse.
a. Organizational Level - The Organizational Level setting allows you to dictate which level of the organization the warehouse will exist at, for example Supervisory vs Executive.
b. Warehouse Environment -Different environments can be created during the onboarding process, for example Production vs Test.
c. Warehouse Template - Warehouse Template contains customized rules and warehouse parameters defined by admins.
d. Snowflake Account - Snowflake account where the warehouse resides.
e. Warehouse Name - The name of the newly created warehouse.
f. Resource Constraint - Determines if a warehouse is either a Gen1 or Gen2 warehouse.
g. Statement Timeout - Amount of time, in seconds, after which a running SQL statement (query, DDL, DML, etc.) is canceled by the system.
Select Create schedule to set the warehouse schedule.
The Warehouse Scheduling screen allows you to set several parameters based on time and days of the week, permitting Snowflake to run in the most efficient manner possible, along with a max monthly cost.
- Schedules - Slingshot allows Snowflake to be provisioned with 1
or more schedules with the following parameters
- Start Time and End Times - Schedule begin and end times in ET
- Warehouse Size - Determines the processing power and cost of the warehouse ( See Warehouse size and cost)
- Cluster Min/Max - The number of database instances (can vary from 1-10) devoted to processing
- Scaling Policy - How the warehouse scales to meet demand
- Standard - Minimizes queuing by starting warehouses when demand increases
- Economy - Conserves costs by allowing warehouses to run fully loaded
- Auto-Suspend - Automatically suspend the warehouse after a
predetermined period of inactivity
- When checked a field appears allowing you to set the period of inactivity (parameter varies based on the template settings). The warehouse will auto-suspend after this period expires with no activity.
- If unchecked the warehouse runs continuously even if
inactive.⚠️This results in greater cost.
- Warehouse on toggle determines when the Snowflake Data Warehouse will be on or off.
- To complete warehouse configuration, the schedule must be set for a 24-hour period comprising of 7 days.
- Schedules - Slingshot allows Snowflake to be provisioned with 1
or more schedules with the following parameters
Select the Review schedule - the Warehouse Review screen displays all of the settings for the newly created warehouse details:
- Organization
- Snowflake Account
- Warehouse Template
- Warehouse Name
- Statement Timeout
- Approver(s) (if available)
Click Submit for Approval to start the approval process, or Back to continue adjusting the schedule.
Select Submit Request to confirm you’re ready to submit your request, or Back to Review to make additional changes before submitting.A success message appears and confirms your submission.
Warehouse management
Slingshot allows Warehouse owners, Tenant admins, and Org admins to make adjustments to warehouses. Approvers, like the name says, approve requests.
Approvals
Approvers act as gatekeepers for various requests in the assigned business org or unit (e.g. warehouse provisioning requests, changing a current warehouse schedule, etc). As an Approver, you have the ability to approve, decline, and view assigned requests.
View requests
To view requests,
- Press Requests on the left navigation menu.
- Select the Pending, Approved, or Declined tab to see a list for requests with those statuses.
Or
- From the homepage, scroll to the Approvals Inbox section.
- Click the View Request button for the chosen request.
- Review the Warehouse Modification Request details.
- If necessary, add a message, then decline or approve the request. Always include an explanation for denied requests.
Approve or decline requests
The Approvals Inbox provides you with tabs for
- Open Requests,
- In Progress requests,
- and Closed Requests.
The Closed Requests tab shows processed requests.
Each list includes the warehouse name, request type, status, requestor, maximum monthly cost, and request date.
To approve or decline requests
- Scroll down to the Approvals Inbox on the Homepage or select Approvals Inbox from the left navigation menu.
- Use the Approve button to approve a request - or - use the Decline button to deny the request and add a message explaining the denial.
- Select Decline Request (if necessary).
- The list refreshes and the request disappears from the Approvals Inbox.
Create and manage alerts
You can set custom performance thresholds to alert you (and/or any of your team members) if a warehouse has experienced any unexpected spikes in two key performance metrics: query queuing and query execution time.
Open the Performance alert modal in one of the following ways:
a. Select the check box for a warehouse and then click the Create alert or Manage alert button.
b. Click the overflow menu (three dots all the way on the right) at the warehouse level and select Create alert or Manage alert.
Select the check box for whichever of the three metrics you want to alert on.
Enter threshold values in the text box.
Add any emails that you want to receive the alert emails.
ℹ️Any owners of this warehouse will automatically receive the email as well.Click Save to confirm the updated alert configurations.
ℹ️Note: Performance thresholds are evaluated every hour, meaning alerts will get triggered every hour at most.
Revert warehouse settings
- The revert functionality is only accessible to managed warehouses.
- All pending requests for the warehouse must be complete before reverting settings.
To revert a warehouse to previous settings:
- Navigate to the Warehouse details page for the warehouse.
- Select a history entry from the Warehouse history section in the right sidebar.
- Click the Revert button.
- The Modify warehouse details flow displays your current settings, but you can change any of the settings if you wish.
- Enter a business justification.
- Click Modify schedule.
- The schedule of the warehouse history entry displays, but you can modify the schedule further if you wish.
- Submit for approval.